
This post may contain affiliate links. I receive a small commission if you choose to purchase through the links at no additional cost to you.
I don’t know about you, but seeing all these awesome DIY projects on Pinterest and reading about other bloggers attempts at a DIY project, makes me feel like I can totally do one. I mean I am pretty crafty and creative, but sometimes you just have to know when something is just not “YOUR THING”. Every Saturday K and I hit up all the local garage sales. It is one of my favorite things to do. We wake up around 7, I throw on some yoga pants and running shoes (ya know, cause I obviously just worked out) and we hit the road. I usually have an idea of which order we are hitting the houses in and if there happens to be a sign along the way just calling my name “LEANNA, LEANNA, COME LOOK AT WHAT ALL THE STUFF WE HAVE” then we make a minor detour to a new destination. A couple of weekends ago, K and I hit the jackpot! His community was hosting their Annual Yard Sale, with over 40 (yes I just said FORTY) homes participating! I was so excited and I could feel the adrenaline rushing through me the night before as I planned out exactly where we would go and in what order. It was genius!As we went to tons of houses, we found so many steals! We bought a few different items, but I just knew I had to find a shelf for his bathroom because we needed more storage. I looked and looked and didn’t find any I liked. Then we stumbled upon this beauty at one of the last houses we went to.
It was love at first sight! Ignore my lack of better photos as I was just so excited about this find. But here it is, I just loved the detail of shelf, the corners, the ridges inside and everything. And guess what we got it for 10 bucks. DONE.
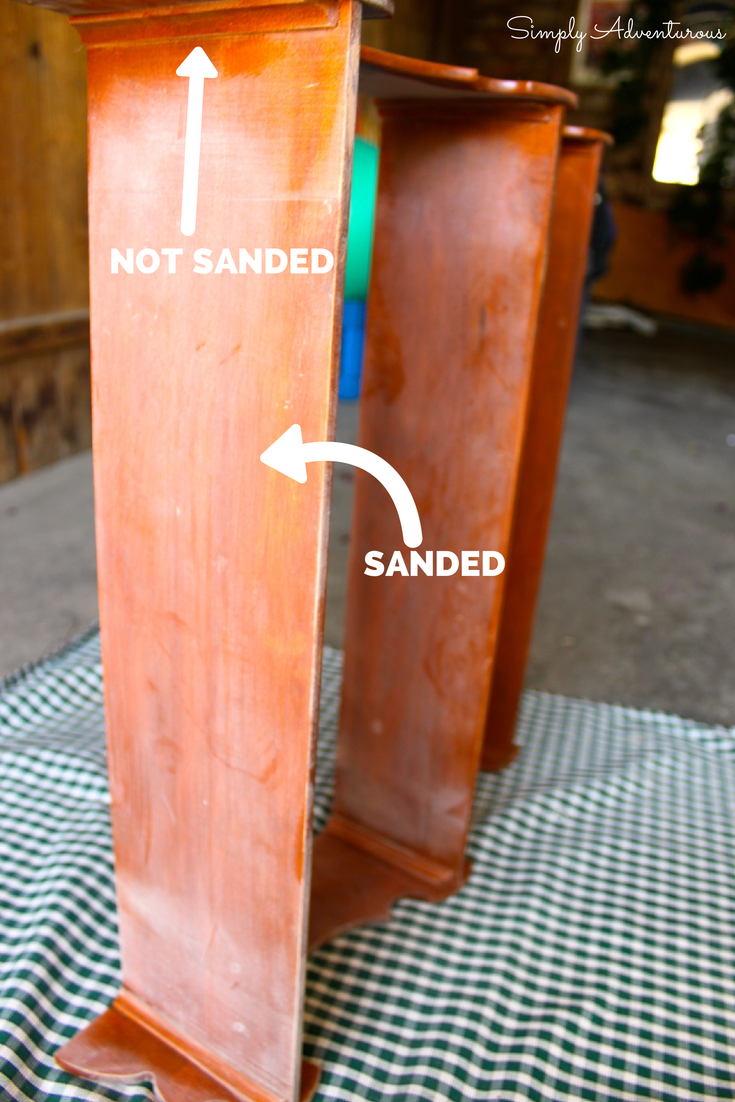
But I wanted to make this my own–paint it black to match the rest of the bathroom accessories, but I had never spray painted anything before. Okay, so I searched and search from blog to blog to find the best way to spray paint. This was either going to be a complete failure or a success! After jotting down ideas from tons of blogs I came up with this easy step system to follow. Okay, okay I’ll get to the pictures soon! Materials:-Rustoleum Black GLOSS Spray Paint -Sandpaper Sponge with handle-Towel or two-PATIENCEProcedure:1. I wiped down the shelf because it was all dusty and it needed a good wipe down before I started sanding. Now I have NEVER sanded anything before, so this was all new to me. At first we bought the sheets of 150 Sand Paper and I was all like, HECK NO, there is no way my tiny hands are going to be able to hold that paper and sand hard enough! 2. So we went back to Home Depot and I got a Sandpaper Sponge with a handle for an easier grip. It was kind of like this one here. So I sanded and sanded, you know cause I knew what I was doing. I got every crevice and edge and corner and sanded the poop out of the shelf. Not too much though, just enough so I could repaint it.
Make sure you sand everything! Especially little marks in the wood or paint from another source.
3. After I sanded, I wiped everything down with a damp hand towel before painting.
**NUMBER 4 IS IMPORTANT**
I can be very patient at times, but when it comes to a craft I have an idea of what I want it to turn out like and I just want it to happen right away. However I spray painted in a rush before and my craft did not turn out how I wanted it to.
4. Spray Painting: Spray in layers. If you don’t cover the entire thing the first time it is OKAY. Here is my first round of spraying. Notice how there are tons of areas that aren’t covered. That is okay. The one thing I learned is to be patient with spray paint.
- Be Patient
- Shake can for the full time it says on the directions (usually 1-2 minutes)
- Test out spray can before using it on your project
- Wait 5-20 minutes in between each coat (if you do so you avoid dripping and you get full coverage)
- Don’t Spray too close, but don’t spray too far away because you will miss 95% of your project
5. It took me a good 40-60 minutes to get everything sprayed including waiting times. I just went with my gut when I knew I was ready to give it another coat again.
 |
| The shelf was not dry yet, but I loved that you could see the gloss finish from the sun and the glare of the tire |
6. Let dry for 24 hours before putting up. A little extra time doesn’t hurt.
Here it is! Our bathroom is a little tiny, but it was just what we needed so we aren’t stepping on stuff on the floor anymore. Ignore some of the clutter! My next step is to find a couple small containers to put on the shelf to hold some of our extra knick knacks and such!
I love the little details with this shelf, the corners, the curls, it’s so perfect.
Have you done a Spray Paint Makeover? Was it successful? What are your tips for spray painting? I would love to add to the list for my next attempt!


I really like it. We’ve spray painted a few things around our house but always good to get more tips.
That’s awesome! I need to spray paint a few things and this will definitely help next time! <3
Thats super cute! I love looking for items to redo and especially for a steal of a price!
Really handy tips! I have a few spray paint projects coming up.
Oh my gosh this looks brand new! Pinterest makes me feel like I would NEVER be able to do the things on there, but this shows me that it’s possible!
Whoa, it looks AWESOME!
Wow it looks great! Awesome tips! I love to spray paint…everything. I spray painted my file cabinet last summer. haha
Awesome guide! Thanks!!
Pinned! I want to refinish a table and this will come in so handy!
Wow, what a great transformation!
Wow beautifully done, like the yoga pants comment lol. I have no DIY bone in my body y’all are creative x
Love what you did with the shelving unit, love up cycling old furniture.
The final product looks amazing! I have never spray painted something, but now I totally want to try. You’ve inspired me!
Thanks for the tutorial! I’ve always thought it would be a daunting task.
I am a spray paint addict. I spray paint clothes. Shoes. Crafts. Furniture. LOVE this tutorial.
Love what you did with it – looks great!
Thank you!
Leanna Ranieri
LMCD Marketing
Marketing Intern
702.521.6913
Thank you Carly!
Leanna Ranieri
LMCD Marketing
Marketing Intern
702.521.6913
what a great DIY! And a great way to use it!
This is great! I love finds like that, and you did it up so beautifully! Gotta love Pinterest 🙂
I NEED to try a spray painting project stat! Loved how yours turned out!
Thanks Annabel! It was easier than I thought.
YES, do try! They are quite fun! Thank you Kristine!